From Sanskrit to English
Sanskrit pronunciation: Parsvottanasana (parsh-voh-tahn-AHS-anna)
Meaning: parsva = side; ut = intense ; tan = to stretch out.
Parsvottanasana, as its name indicates, involves an intense lateral stretch. That is why it is known in English as Intense Side Stretch Pose. People also often refer to it as Pyramid Pose due to the overall shape our bodies come to form when getting in this pose.
Benefits of Parsvottanasana
+ Stretches the legs, hips, spine, shoulders, wrists and chest
+ Strengthens the legs
+ Opens the chest and shoulders
+ Stimulates the abdominal organs
+ Improves digestion, posture and balance
+ Calms the mind and nervous system
Yoga for every BODY
To fully enjoy the benefits of Parsvottanasana, it is key to spend time building a solid foundation. Maintaining square hips with both legs extended and a long, straight spine can be challenging. It requires strength, flexibility and balance. All the modifications below were thought out to help us master a correct alignment before going for the full pose. That way, we can add a deeper forward fold and revolved prayer without compromising our safety.
Standard Parsvottanasana
1. From Tadasana step or jump open to the right with your arms open to the side, palms facing down. Your heels should be aligned with the respective hip, one leg-distance apart or less. Both legs are extended with your front foot parallel to the longer edge of the mat and your back toes turned in to form a 30 to 45 degree angle with the shorter edge of your mat.
2. Rotate your upper body towards the front and square your hips. Your arms, torso and hips should be parallel to the shorter edge of your mat.
3. Bring your palms together behind your back in Pashchima Namaskarasana (reverse prayer).
4. Inhale, root through your feet, engage your legs, activate your mula bandha and uddiyana bandha, press into your palms, lengthen your spine and the sides of your torso and lift your chest.
5. Exhale, bend at the hip joint to fold forward with a straight spine, sending your heart towards your front leg. Make sure your hips are still aligned and both legs extended. Keep pressing into your palms to broaden your shoulders and chest.
6. Send your gaze to your third eye or to your big toe.
Modification 1: Using a chair
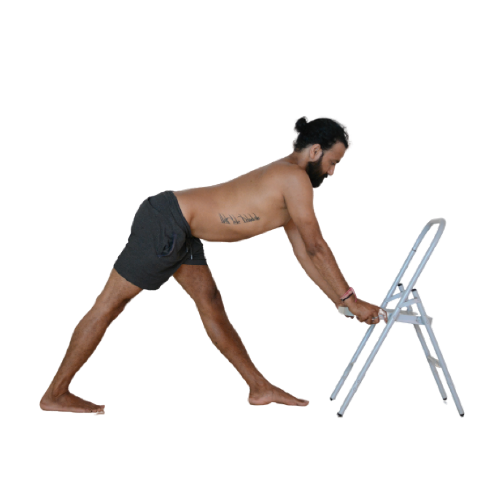
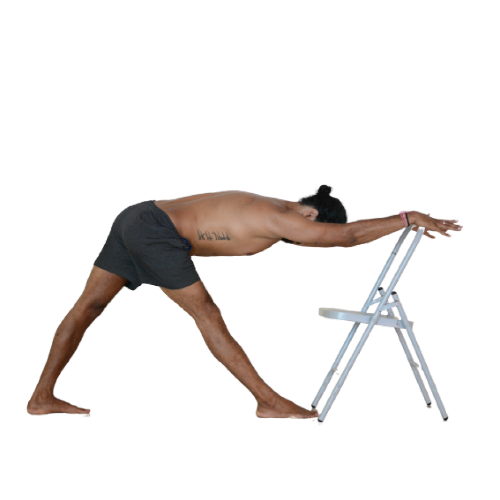
Keeping your feet on separate parallel lanes will help you straighten your legs and square your hips. Using the chair as support for your arms, will enable you to find length in your spine and allow you to keep your shoulders broad and chest open.
A
B
1. Set up a chair at the top of your mat and stand in Tadasana, opposite the chair and towards the end of your mat.
2. Step forward with what will become your front foot. Your feet should be on separate parallel lanes, at a leg distance or less; your front toes pointing forward and your back toes turned in.
3. Extend both legs and square your hips, so they can become parallel to the chair seat.
4. Place your hands on your hips, root through your feet, engage your legs, activate your locks, lengthen your spine and lift your chest.
5. Come forward with a straight spine and grab the sides of the chair seat. Push into the chair, straighten your elbows, and look forward (see picture A).
6. For a more challenging version of this, repeat steps 1 to 4. Then, come forward with a straight spine and reach out for the top rail of the chair. Keep your upper body parallel to the floor and your head in line with your spine (see picture B).
Modification 2: Using Blocks
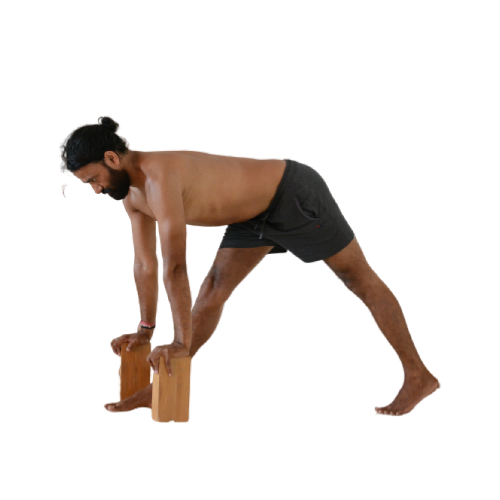
The next stage would be to lower the height, using two blocks instead of a chair. The blocks will still give you enough support to facilitate the opening in your shoulders and chest. If you notice a misalignment in your hips and spine, try lifting your back heel and placing it against a wall (see picture C).
C
D
1. Grab two blocks and stand in Tadasana in front of a wall.
2. Step forward with what will become your front foot. Your feet should be at a leg distance or less, on two separate parallel lanes, with your toes pointing forward.
3. Come onto the ball of the back foot and send your back heel against the wall (if needed, slide forward a little with your front foot).
4. Place the blocks on each side of your front foot, onto their vertical side. Come up, straighten your legs, square your hips, and put your hands on your waist.
5. Inhaling, press into your feet, engage your legs, activate your bandhas, lengthen your spine along with the sides of your torso, and lift your chest.
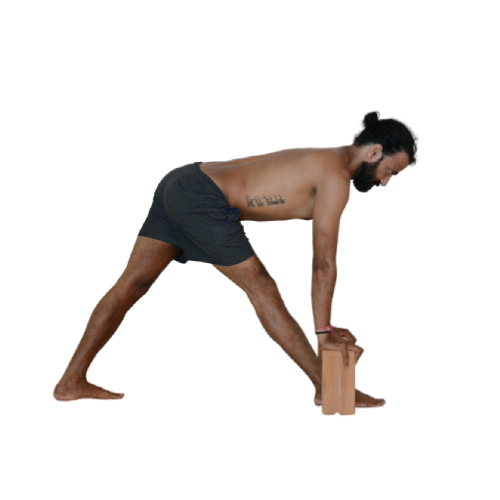
6. Exhale, bend forward until your torso becomes parallel to the floor and reach out for the blocks. Pushing into the blocks straighten your elbows, open your chest and look forward.
7. Whenever you feel ready, you can try repeating this with both feet on the floor (see picture D).
Modification 3: No Props
If the chair and blocks feel too high by now, you can try reaching out for the floor with your fingertips or even flatten your palms entirely onto the ground. That said, please make sure you are not losing the alignment in your hips and spine!
E
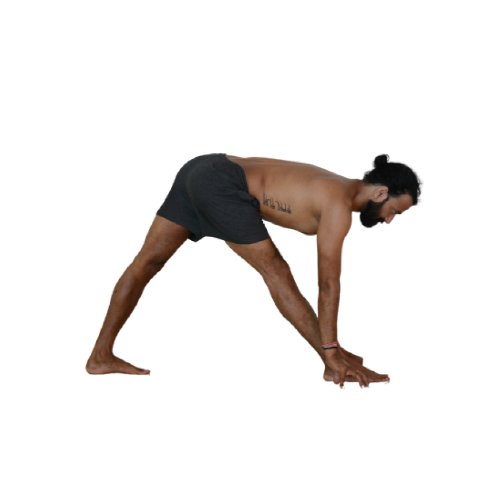
F
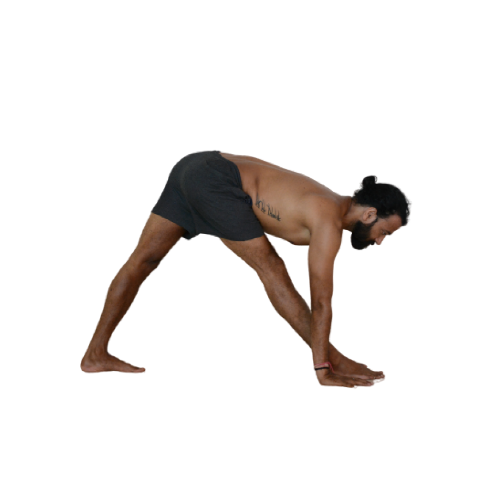
1. From Tadasana step or jump open to the right with your arms open to the side, palms facing down. Your heels should be aligned with the respective hip, one leg-distance apart or less – yet both legs should be extended, your front foot parallel to the longer edge of the mat and your back toes turned in to form a 30 to 45 degree angle with the shorter edge of your mat.
2. Rotate your upper body towards the front and square your hips. The sides of your body should be parallel to the longer edges of your mat and your hips should be parallel to the shorter edge of your mat. Place your hands on your waist.
3. Inhale, root through your feet, engage your legs, activate your bandhas, lengthen your spine along with the sides of your torso, and lift your chest.
4. Exhale, fold forward with a straight spine and reach out for the floor with your fingertips. Your hands should be on either side of your front foot, directly below your shoulders. Press into your fingertips to straighten your elbows, broaden your shoulders and open your chest (see picture E).
5. Once you gain enough space in step 4, see if you can flatten your palms onto the floor. Make sure you press into the floor in order to straighten your elbows, broaden your shoulders and open your chest (see picture F).
Modification 4: Pushing the hips back
Keeping the hips in place is one of the most challenging aspects of Parsvottanasana. If you don’t have props available, use your hands to gently press the femur back and better perform the action of bending at the hip joint.
G
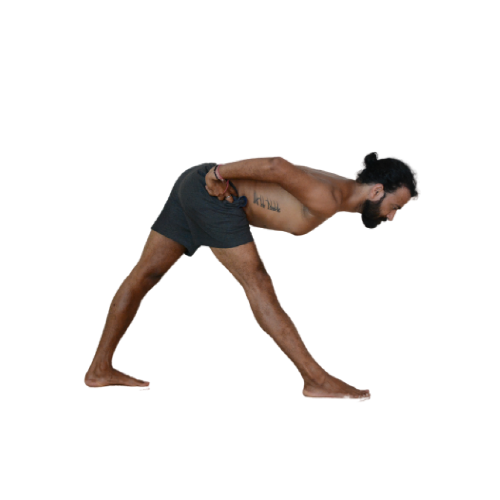
1. From Tadasana step or jump open to the right with your arms open to the side, palms facing down. Your heels should be aligned with the respective hip, one leg-distance apart or less – yet both legs should be extended, your front foot parallel to the longer edge of the mat and your back toes turned in to form a 30 to 45 degree angle with the shorter edge of your mat.
2. Rotate your upper body towards the front and square your hips. Your torso and hips should be parallel to the shorter edge of your mat. Place your hands at the level of your hip creases.
3. Inhale, root through your feet, engage your legs, activate your bandhas, lengthen your spine along with the sides of your torso, and lift your chest.
4. Exhale, fold forward with a straight spine until your upper body is parallel to the ground, and keep pushing your hips back gently with your hands. Look ahead.
Modification 5: Using a strap and a block
Looping a strap around your hip crease also helps maintain a correct alignment of the hips since it pushes the femur bone back into its socket. Holding a block between the hands can enable you to activate your palms and therefore will help you open your shoulders and chest. If this doesn’t feel right, you can grab the opposite elbow (see picture I).
H
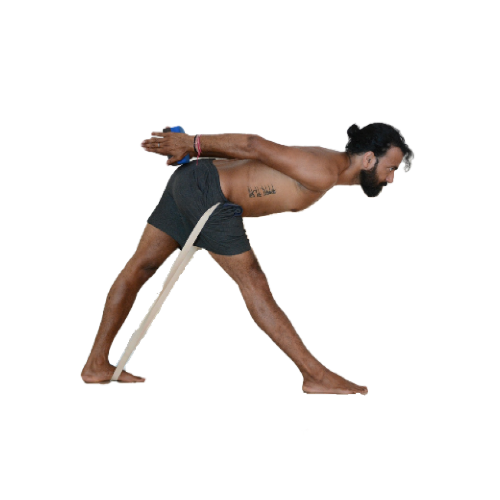
1. Stand in Tadasana with a block and strap close by.
2. Step or jump open to the right with your arms open to the side, palms facing down.
3. Your heels should be aligned with the respective hip, one leg-distance apart or less – yet both legs should be extended, your front foot parallel to the longer edge of the mat and your back toes turned in to form a 30 to 45 degree angle with the shorter edge of your mat.
4. Rotate your upper body towards the front and square your hips. The sides of your body should be parallel to the longer edges of your mat and your hips should be parallel to the shorter edge of your mat.
5. Place a strap underneath the arch of your back foot and loop it around your front hip crease. Make sure it’s tight enough.
6. Grab your block and hold onto its shorter edge with your palms, behind your back.
Inhale, root through your feet, engage your legs, activate your bandhas, press into the block, lengthen your spine along with the sides of your torso, and lift your chest.
7. Exhale, fold forward with a straight spine until your upper body is parallel to the ground. Keep pressing into the block to open your shoulders and chest. Look ahead.
Modification 6: Grabbing the elbows
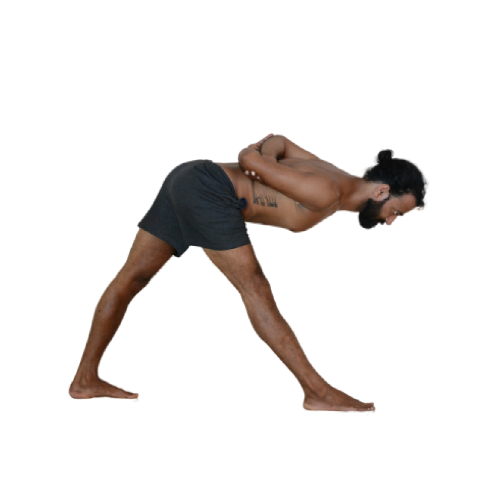
This modification is closer to the full version of Parsvottanasana, but bear in mind that it may be more accessible than the previous modification. If you notice your shoulders closing when attempting to revolve your prayer and / or fold forward fully, a good solution for you may be to grab your opposite elbow and / or keep the upper body parallel to the floor.
I
1. From Tadasana step or jump open to the right with your arms open to the side, palms facing down. Your heels should be aligned with the respective hip, one leg-distance apart or less – yet both legs should be extended, your front foot parallel to the longer edge of the mat and your back toes turned in to form a 30 to 45 degree angle with the shorter edge of your mat.
2. Rotate your upper body towards the front and square your hips. Your torso and hips should be parallel to the shorter edge of your mat. Reach out for your opposite elbow behind your back.
3. Inhale, root through your feet, engage your legs, activate your bandhas, hold onto your elbows, lengthen your spine along with the sides of your torso, and lift your chest.
4. Exhale, fold forward with a straight spine until your upper body is parallel to the ground. Look ahead.
Interested in becoming a yoga teacher?
Newsletter
Upcoming events and latest blogs