From Sanskrit to English
Sanskrit pronunciation: Prasarita Padottanasana (pra-sa-REE-tah pah-doh-tahn-AHS-anna)
Meaning: to spread, outstretch, expand ; pada = foot, leg ; ut = intense ; tan = to stretch out.
Most commonly known in English as Wide Legged Forward Bend this pose is an intense stretch and energizing inversion categorized in four parts A, B, C and D.
Benefits of Prasarita Padottanasana
+ Strengthens the feet, legs and core
+ Stretches the back of the legs, glutes, lower back and spine
+ Tones leg muscles, glutes and core
+ Stimulates the muscles in the abdominal cavity
+ Increases blood flow
+ Improves digestion
+ Calms the mind and the nervous system
Yoga for every BODY
We’ve said it and we will never repeat it enough: yoga is all about the spine. Because we want to rush into the forward fold and desperately have our head touch the floor, we may quickly forget about our spine and shoulders. Over time, especially for Ashtanga practitioners who repeat the same sequence over and over, this can lead to injuries. So why don’t we take it slowly and go through the modifications to understand or perhaps remember what Prasarita Padottanasana is all about?
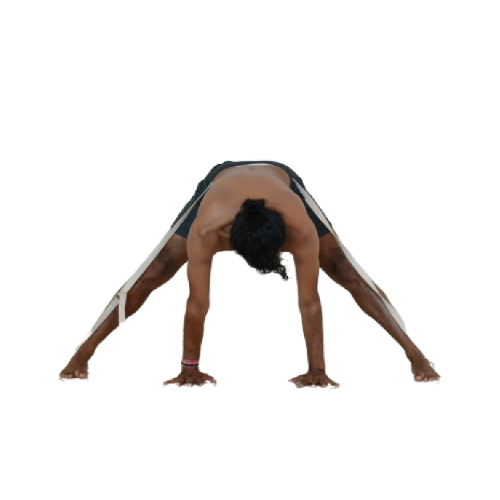
Standard Prasarita Padottanasana A
1. From Tadasana, inhale, step or jump open to the right. The distance between your feet should be equal to or shorter than the length of one of your legs. Make sure the outer edges of your feet are parallel to one another and to the shorter edges of your mat (you may need to tilt your big toes slightly inward for that to happen).
2. Place your hands on your hips and straighten your legs.
3. Inhale, press into your feet, engage your legs, activate your mula bandha and uddiyana bandha, lengthen your spine, and lift your chest.
4. Exhale, fold forward with your chest open and place your hands to the floor.
5. Inhale, look up and lengthen your spine.
6. Exhale, fold forward, placing your hands on the same line of your feet. Your elbows should be bent and the crown of your head should land between your hands.
7. Send your gaze to your third eye.
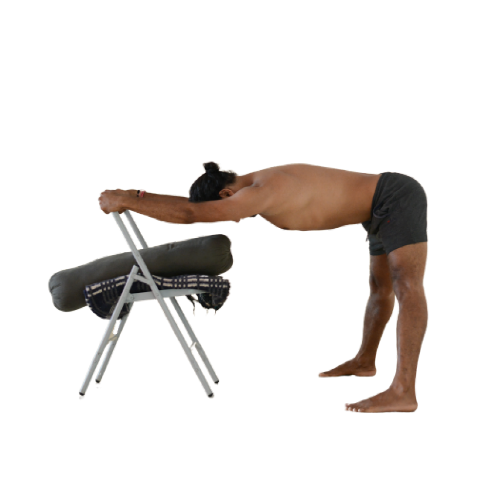
Modification 1: Using a chair
As you begin working on Prasarita Padottanasana A, using a chair could be very helpful to acquire a correct alignment of the body, instead of rushing into the forward fold. It is best to gradually lower the body with a correct alignment then aiming for the ground risking injuries.
A
B
1. Set up a chair and place a blanket over its seat with a bolster on top, lengthwise.
2. Stand opposite the chair seat, and find a distance that allows your body to form a 90 degree angle when you bend forward to hold onto the top rail of the chair (you may need to try this a few times).
3. Once you’ve found the appropriate distance, open your legs wide (more or less 3 – 4 feet apart, depending on your height) making sure the outer edges of your feet parallel to one another.
4. Place your hands on your hips and straighten your legs.
5. Inhaling, root through your feet, engage your legs to lift your knee caps, activate your mula bandha and uddiyana bandha, lengthen your spine and lift your chest.
6. Exhaling, fold forward with your chest wide open, grab the top rail of the chair. Make sure your hips are in line with your heels and look down so that your neck is in line with your spine (see picture A).
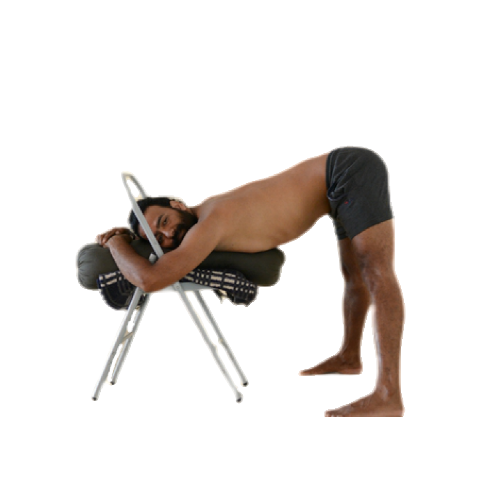
7. To deepen this pose, you can release the top rail and come to lie on the bolster with your chest, tilting your head to one side, and resting your hands on top of each other at the front of the bolster (see picture B). You can stay here for a few breaths and then repeat this, tilting your head on the opposite side.
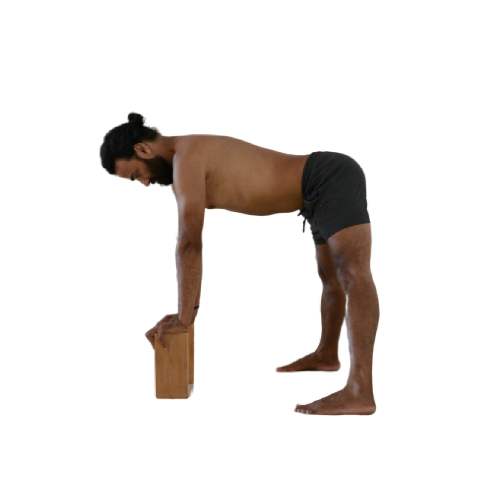
Modification 2: Using blocks
A deeper version of modification 1 would be to use blocks which you can gradually lower as you gain flexibility.
C
D
1. Start by placing two blocks on their higher side. Follow steps 1, 2, 3, 4 for Standard Prasarita Padottanasana, but instead of reaching out for the floor with your hands, reach out for the blocks. It may take a few trials to find the appropriate distance between you and the blocks. Make sure your wrists fall directly below your shoulders and that your spine is straight. Look down at the floor so that your neck is in line with your spine (see picture C).
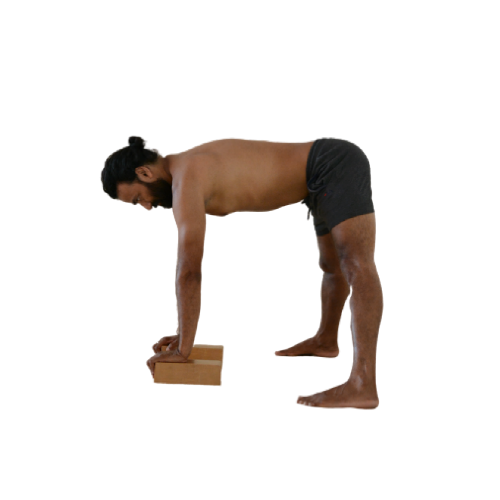
2. Once you are comfortable here, you can try placing the blocks on their lower side. Make sure not to let your shoulders collapse to keep your spine safe (see picture D).
Modification 3: Using Straps
In order not to lose the correct alignment of your legs and sacrum, loop straps around your body!
E
F
1. Loop two belts together to create one big loop.
2. Stand over the strap, opening your legs wide (more or less 3 – 4 feet apart, depending on your height). Make sure the outer edges of your feet are parallel to one another (you may need to tilt your big toes slightly inward for that to happen) and that the strap is placed nicely beneath the arches of your feet.
3. Hold the strap at the level of your lower back and follow the instructions for Standard Prasarita Padottanasana A. Begin by placing your wrists directly below your shoulders, keeping the arms straight. The strap should cross over at the level of your sacrum, so tighten the loop accordingly (see picture E).
4. Once you are comfortable here, you can try walking your hands back till you reach the line of your feet, bedding your elbows at a 90 degree angle and placing your head halfway between your palms (see picture F).
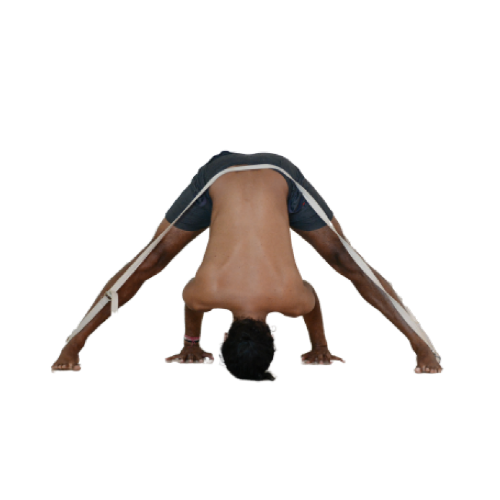
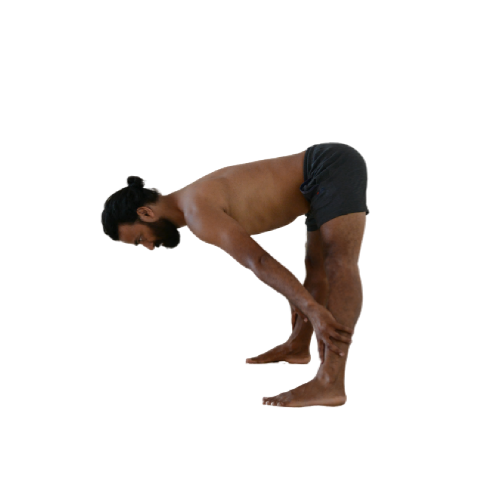
Standard Prasarita Padottanasana B
In Ashtanga Yoga start from standard Prasarita Padottanasana A:
1. Inhale, look up and lengthen your spine; exhale, place your hands on your hips; inhale, come all the way up, grow your spine tall; exhale, pause here with your hands on your hips and your legs open, your feet parallel to one another.
2. Inhale, spread your arms out to the sides, parallel to the floor, palms facing down.
3. Exhale, place your hands on your hips.
4. Inhale, press into your feet, engage your legs, activate your mula bandha and uddiyana bandha, lengthen your spine, and lift your chest.
5. Exhale, fold forward with your chest open, keeping your hands on your waist and your elbows bent.
In Hatha Yoga, you can also attempt this pose directly from Tadasana:
1. Inhale, step or jump open to the right. The distance between your feet should be equal to or shorter than the length of one of your legs. Make sure the outer edges of your feet are parallel to one another and to the shorter edges of your mat.
2. Place your hands on your hips and straighten your legs.
3. Fold forward with your chest open, keeping your hands on your waist and your elbows bent.
Modification 4: Using a block to support the head
If you can’t reach the floor yet with your head, it is a good idea to use a block to support it. This will prevent your shoulders from rounding and will enable you to keep your spine and neck safe.
G
H
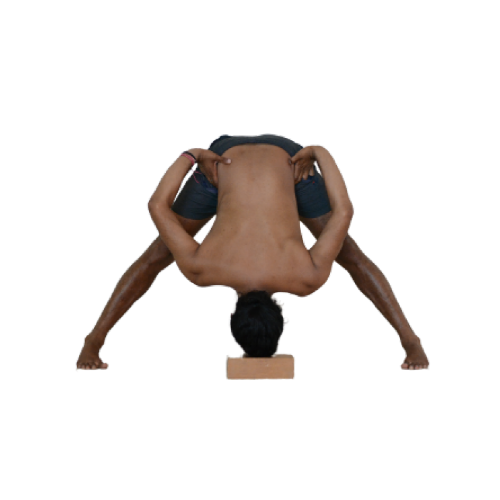
1. Open your legs wide (more or less 3 – 4 feet apart, depending on your height). Make sure the outer edges of your feet are parallel to one another (you may need to tilt your big toes slightly inward for that to happen).
2. Place a block on its higher side, half way between your feet and along the line of your torso, which is perpendicularly bisecting the line joining both feet. (essentially you want it to welcome your head so you may need to adjust the distance along the torso line accordingly).
3. Place your hands on your hips and straighten your legs.
4. Inhale, press into your feet, engage your legs, activate your mula bandha and uddiyana bandha, lengthen your spine, and lift your chest.
5. Exhale, fold forward with your chest open, keeping your hands on your waist. Place your head on top of the block (see picture E).
6. Once you gain flexibility and space, try placing lowering the block (see picture F).
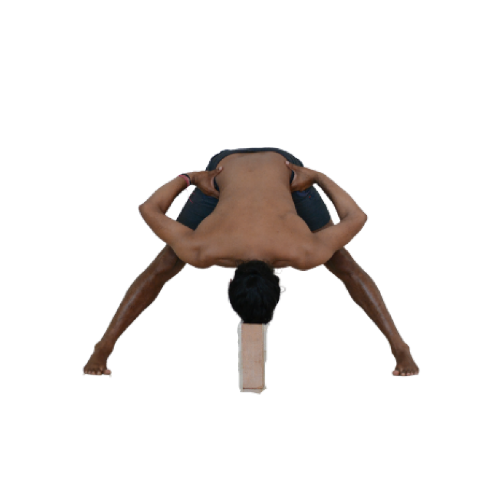
Standard Prasarita Padottanasana C
In Ashtanga Yoga start from standard Prasarita Padottanasana B:
1. Take a deep breath in and come all the way up; exhale, pause here with your hands on your hips, your legs open and straight with your feet parallel to one another.
2. Inhale, spread your arms out to the sides, parallel to the floor, palms facing down.
3. Exhale, interlace your fingers behind your back.
4. Inhale, press into your feet, engage your legs, activate your mula bandha and uddiyana bandha, lengthen your spine, and lift your chest.
5. Exhale, fold forward with your chest open, place your head onto the ground between your feet and send your arms overhead with your fingers interlaced together.
In Hatha Yoga, you can also attempt this pose directly from Tadasana:
1. Inhale, step or jump open to the right. The distance between your feet should be equal to or shorter than the length of one of your legs. Make sure the outer edges of your feet are parallel to one another and to the shorter edges of your mat.
2. Interlace your fingers behind your back and straighten your legs.
3. Fold forward with your chest open, place your head onto the ground between your feet and send your arms overhead with your fingers interlaced together.
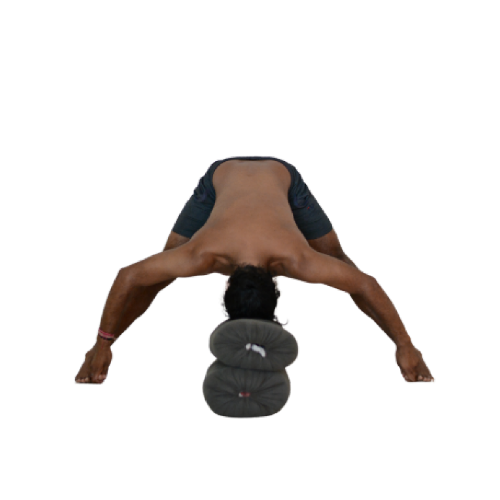
Modification 5: Using bolsters to support the head
If you can’t reach the floor yet with your head, it is a good idea to use bolsters to support it instead of letting it hang. This will keep your neck and spine safe. In addition, this will give you something to push into and help you focus on the alignment of your arms and legs.
I
1. Place two bolsters on top of each other, lengthwise.
2. Follow the instructions for Standard Prasarita Padottanasana C but instead of aiming for the floor with your head, go for the bolsters!
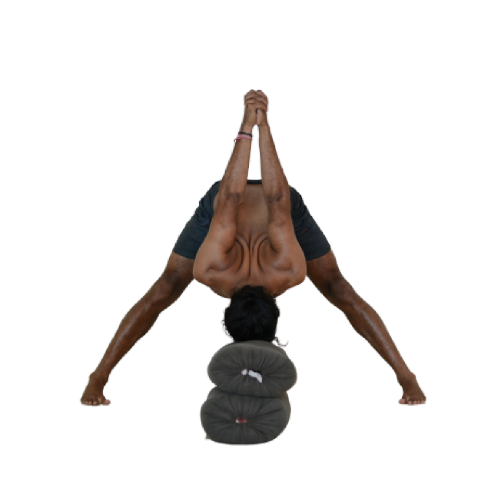
Standard Prasarita Padottanasana D
In Ashtanga Yoga start from standard Prasarita Padottanasana C:
1. Take a deep breath in and come all the way up; exhale, release the hands and place them on your hips. Make sure your legs are straight and your feet parallel to one another.
2. Inhale, spread your arms out to the sides, parallel to the floor, palms facing down.
3. Exhale, place your hands on your hips.
4. Inhale, press into your feet, engage your legs, activate your mula bandha and uddiyana bandha, lengthen your spine, and lift your chest.
5. Exhale, fold forward with your chest open, grab your big toes with your yogi toe lock.
6. Inhale, look up and lengthen the spine.
7. Exhale, fold forward with your spine long and point your elbows towards the sky.
In Hatha Yoga, you can also attempt this from Tadasana:
1. Inhale, step or jump open to the right. The distance between your feet should be equal to or shorter than the length of one of your legs. Make sure the outer edges of your feet are parallel to one another and to the shorter edges of your mat.
2. Place your hands on your hips and straighten your legs.
3. Fold forward with your chest open, grab your big toes with your yogi toe lock, pointing your elbows towards the sky.
Modification 6: Holding onto the shins
If you cannot grab your big toes, it is best to grab your shins in order to keep your spine safe (see picture J).
J
Modification 7: Using bolsters to support the head
If you can grab your big toes but can’t reach the floor with your head or feel that your shoulders are rounding when you attempt to do so, use bolsters (see picture K).
K
1. Place two bolsters on top of each other, lengthwise.
2. Follow the instructions for Standard Prasarita Padottanasana D, yet instead of aiming for the floor with your head, go for the bolsters!
Interested in becoming a yoga teacher?
Newsletter
Upcoming events and latest blogs