What is Utkatasana / Chair Pose?
It is a strengthening and heat-building asana that brings all parts of your body together into a cohesive and powerful whole.
This asana is a meditation on determination and perseverance, as well as commitment. To successfully perform Chair Pose, you must seamlessly unite the strength of the legs, arms, and torso as you lift your core muscles and lengthen your spine.
Chair Pose demands strength and stamina in the body, but also focuses on the breath and mind. When you are centered and aligned in the posture, you’ll feel like you’re accessing a great well of energy.
From Sanskrit to English:
Sanskrit pronunciation: Utkatasana (OOT-kah-TAHS-anna)
Meaning: utkata = powerful, intense, mighty.
Known in English as chair Pose, Fierce Pose, Powerful Pose or Awkward Pose, this asana has its origin in Hindu mythology. It follows the struggles of divine prince Rama who – after fourteen years in exile from the Kosala kingdom – found courage to reclaim his crown and throne. Thus, when we get into Utkatasana, it’s as though we were sitting in an imaginary throne, allowing ourselves to find our seat of power within the pelvis region.
If you want to know more about Yoga Teacher Training, click here.
Benefits of the Utkatasana pose
+ Strengthens legs, hips and core
+ Stretches the upper body
+ Tones the organs in the abdominal cavity
+ Opens the chest for better breathing
+ Improves nervous and immune systems
+ Improves balance and focus
Yoga for every BODY
If you practice Ashtanga Yoga, you may be familiar with Utkatasana as part of the Surya Namaskar B (Sun Salutation B) and therefore used to doing the pose with your feet together. If you are new to this pose, however, we invite you to practice with your feet apart to steady your balance.
Common mistakes when practising Utkatasana include:
1. Sending the shoulders towards the ears and leaning too far in with the torso.
2. Arching the lower back as if you were doing Cow Pose.
3. Misaligning the knees by either opening them to the sides, placing one knee in front of the other or sending the knees beyond the toes.
In each situation, the back and knees are at high risk. In order to practice safely, you may want to go through the various modifications before attempting the standard version of Utkatasana. The modifications are arranged in such a way that you can begin working on building a solid foundation and slowly progress towards deeper versions of Utkatasana.
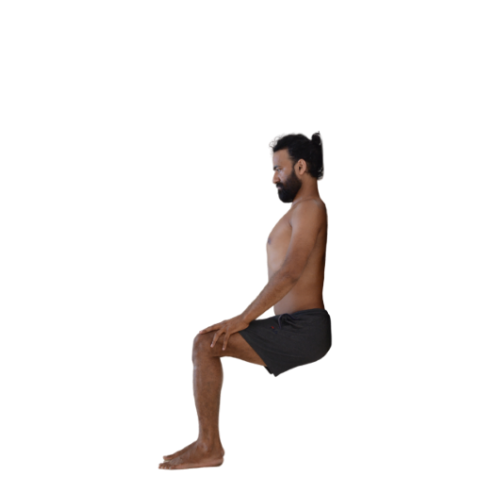
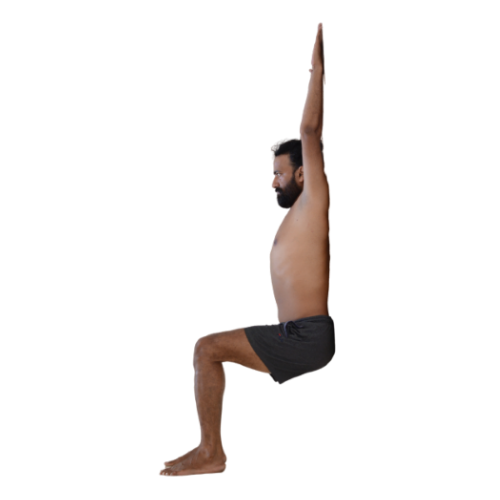
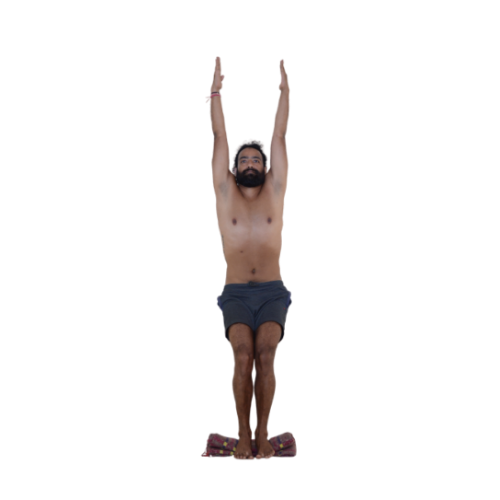
Standard Utkatasana
1. From Tadasana (Mountain Pose) place your feet hip-distance apart or together. If needed, separate your heels slightly so that the outer edge of your feet are parallel to one another.
2. Sending your weight towards your heels, bend your knees and lower your hips as if you were coming to sit on a chair. Your legs can form around a 120 degree angle or a 90 degree angle at knee joint; the important thing here is that your knees don’t cross your big toes.
3. Raise your arms overhead and alongside the ears, with the palms of your hands facing each other.
4. Extend your arms and fingers. Your palms can be shoulder-distance apart or together. With your chin slightly tucked in, send your gaze towards your hands. Roll your shoulders back, far from the ears, and open your chest.
5. Engage your core, send your navel towards your spine and tuck your tailbone slightly. Careful not to arch your back. Instead, use your mula bandha (root lock) and uddiyana bandha (abdominal lock) to keep the lower back long and straight.
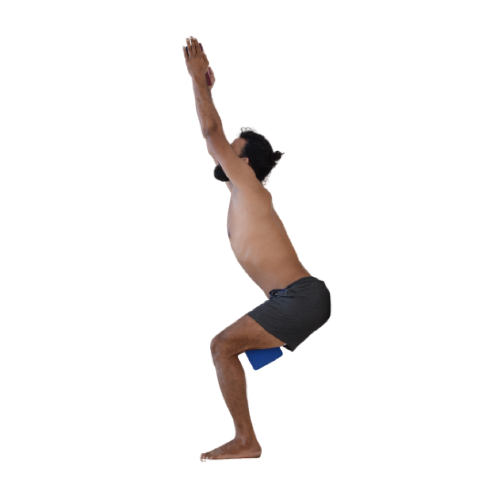
Modification 1: Building a strong foundation
Using a wall to support the back helps reduce the pressure some of us might feel on the knees – especially at the beginning. In addition, it enables us to build strength in the ankles, knees and thighs, while also working on the correct tilting of the tailbone. Placing a block between the inner thighs will allow us to further understand the expected rotation of the pelvis in Utkatasana.
A
B
C
1. Stand in Tadasana approximately 30 cm away from the wall, your feet hip-distance apart.
2. Lower your hips until your bottom touches the wall. Then release your back and head against the wall.
3. Keep the knees directly above your ankles and slide down to form a 90 degree angle.
4. Place your hands on your thighs. Access your mula bandha and uddiyana bandha. Open your chest, broaden your shoulder blades and send them away from the ears. Tuck your chin slightly. Look down and ahead (see picture A).
5. Once you are comfortable here, send the arms overhead with your hands internally rotated, so that your palms rest against the wall. Raise your gaze (see picture B).
6. Next, you can repeat steps 1 to 5 placing a block vertically between your inner thighs and squeezing it tight. Make sure your knees and feet are aligned. Raise your arms and rotate your hands externally, so that the palms can face each other (see picture C).
Modification 2: Building Momentum (version 1)
Once you have integrated the foundation for Utkatasana, you can start drawing more attention to the upper body. That while still using a block between the inner thighs as well as a wall to support your glutes. This will enable you to build momentum for the next phase.
D
E
1. Stand in Tadasana approximately 30 cm away from the wall with your feet together.
2. Place a block vertically between your inner thighs and squeeze it tight.
3. Lower your hips until your glutes touch the wall. Your knees should form a 120 degree angle (approximately) at the knee joint. Make sure they don’t cross your big toes.
4. Send the arms overhead, alongside the ears, with the palms of your hands facing each other. Depress your shoulders, open your chest, send your navel towards your spine and access your uddiyana bandha and mula bandha.
5. If you have problems in the neck or if your muscles in that area are stiff, tuck your chin and send your gaze down and ahead (see picture D). Otherwise, send your gaze towards your hands (see picture E).
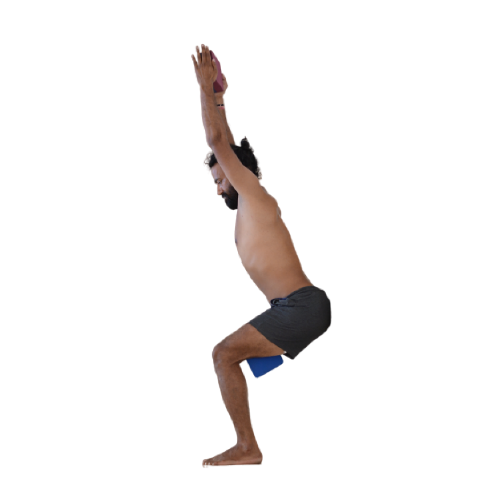
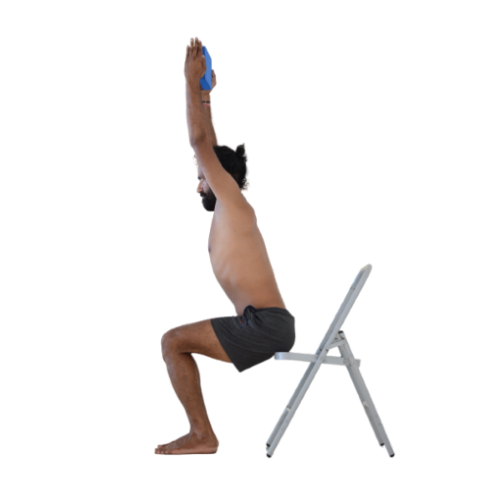
Version 2
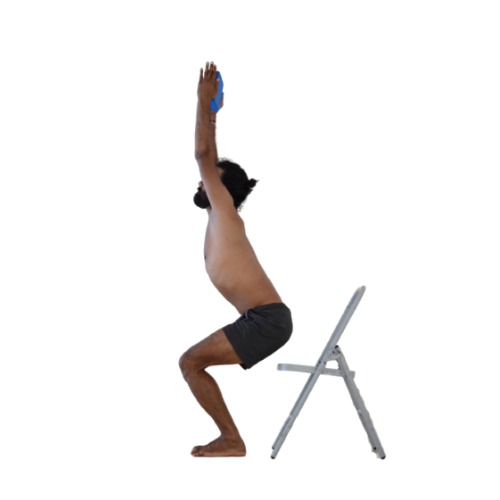
This second version is very similar to the previous one except that it uses a chair as a prop. This is more challenging than the wall since it will force you to lower your knees to a 90 degree-angle (approximately). In addition, the idea here is not to have you sit on the chair but rather, use the edge of the chair to lift yourself away from it.
F
G
1. Set up a chair and stand in Tadasana approximately 30 cm away from it with your feet together.
2. Grab a block horizontally between your hands and lower your hips until your glutes touch the edge of the chair. Your knees should form around a 90 degree angle, make sure they don’t cross your big toes.
3. Squeezing the block between your hands, send the arms overhead, alongside the ears. Depress your shoulders, open your chest and keep sending the energy from your mula bandha to the tip of your fingers – as if you wanted to lift yourself up and away from the chair.
4. If you have problems in the neck or your muscles in that area are stiff, tuck your chin and look down, slightly ahead (see picture F). Otherwise, send your gaze to your hands (see picture G).
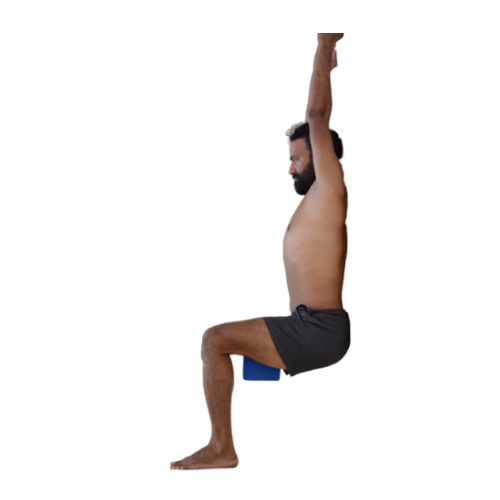
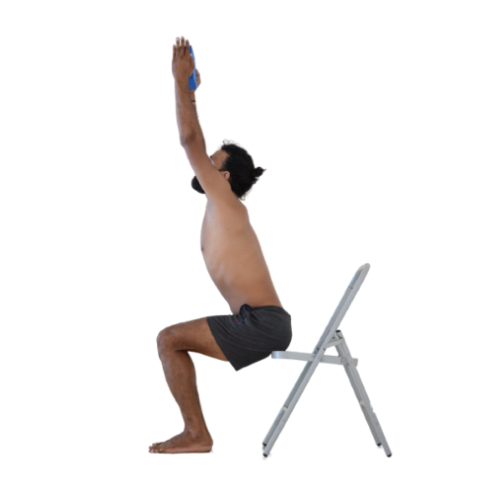
Modification 3: Holding onto the block
You can choose to access your core strength here and go from modification 2 version 2 to modification 3. Otherwise, follow the instructions below to access this modification. The ladder uses a chair as a mental support more than a physical one.
H
I
1. Set up a chair and stand in Tadasana approximately 30 cm away from it with your feet together.
2. Grab a block horizontally between your hands and lower your hips towards the edge of the chair until your knees come to form around a 120 degree angle at your knee joint. Make sure they don’t cross your big toes.
3. Squeezing the block between your hands, send the arms overhead, alongside the ears. Depress your shoulders, open your chest and keep sending the energy from your mula bandha to the tip of your fingers while simultaneously sending your tailbone down and weight towards your feet.
4. If you have problems in the neck or your muscles in that area are stiff, tuck your chin and look down, slightly ahead (see picture H). Otherwise, send your gaze to your hands (see picture I).
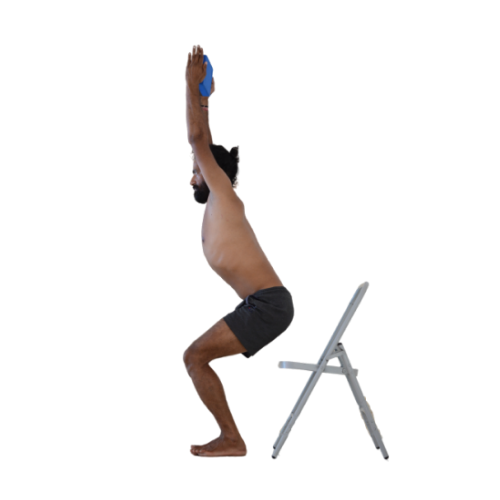
Modification 4: Supporting the heels
Using a blanket beneath the heels can significantly reduce the tension that may be felt in the soleus muscles and achilles tendons. The next two pictures are taken from two different angles to illustrate the same idea.
J
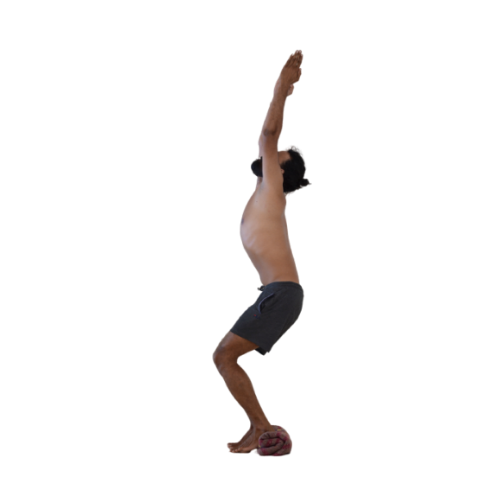
1. Roll a blanket, adjusting it to the height that suits you best and place it beneath your heels.
2. Follow the steps of standard Utkatasana to get into the pose.
Interested in becoming a yoga teacher?
Newsletter
Upcoming events and latest blogs