What is Uttanasana / Stanard Forward Bend?
The name comes from the Sanskrit words ‘uttana’ meaning “intense stretch” and asana meaning “posture”.
Uttanasana is a purposeful extension of the entire back body including the territory from the soles of the feet and up the backs of the legs. It spans the lower, middle, and upper back, rises up the neck and circles over the scalp and back down the forehead, finally ending at the point between the eyebrows.
From Sanskrit to English:
Sanskrit pronunciation: Uttanasana (OOT-tan-AHS-anna)
Meaning: ut = intense; powerful tan = to stretch / lengthen; uttana = intense stretch
Known in English as Standing Forward Bend or Standing Forward fold, uttanasana is a posture of surrender, patience and acceptance. Not mentioned in the classic texts of yoga, it was first found documented in the 19th century in Mysore (India) and is considered an important pose for its multiple benefits.
Benefits of the Uttanasana pose
+ Strengthens legs, hips and core
+ Stretches the upper body
+ Stretches the back of the legs, the hips and the spine
+ Strengthens the legs
+ Increases blood circulation
+ Stimulates the kidneys, liver and abdominal muscles
+ Improves digestion
+ Calms the mind and balances the nervous system
It is also known to be therapeutic for headaches, sinusitis, asthma, menopause symptoms, infertility, insomnia, high blood pressure, and osteoporosis.
Yoga for every BODY
Uttanasana is a stretch of the entire back body: from the soles of the feet, up the back of the legs, along the spine, neck, over the scalp, and to the point between the eyebrows (third eye). As its name suggests, it’s intense. And the objective is not to reach the back of the ankles with your hands but rather, to experience everything happening in between. We want to prioritize length in the front body over depth in the pose. Thus make sure to listen to your body and adapt your practice with the modifications below that mostly suit your needs.
Standard Uttanasana
1. Stand in Tadasana (Mountain Pose) with your feet together. If needed, separate your heels slightly so that the outer edge of your feet are parallel to one another.
2. Press into the four corners of your feet and start activating your locks. Raise your arms up and elongate your entire body towards the sky.
3. Bend forward from the hip joint. As your torso descends, keep lengthening your spine and opening your front body to send your heart towards your thighs.
4. Keeping the legs extended, place your hands behind your ankles or besides your feet, and roll the top of your inner thighs slightly.
5. Relax your neck and let your head hang.
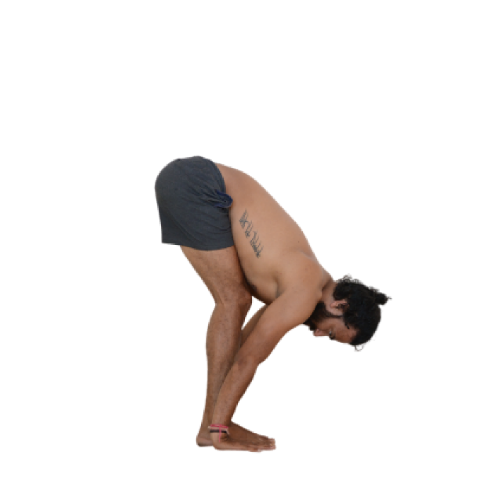
Modification 1: Bending the knees
If you have no props available but your hamstrings are tight, you notice that your back is rounding and / or that your shoulders are shrugging, follow the instructions for a Standard Uttanasana keeping your knees bent (see picture A). This will relieve a lot of pressure on the knees and in the lower back.
If this modification doesn’t suit, don’t worry, there’s always an alternative! You can continue working on Ardha Uttanasana and give your body the time it needs.
A
Modification 2: Gaining Space (version 1: using a chair)
If you’re not afraid of heights, using a chair will allow you to gain space for a deeper exploration of the pose. In Iyengar this modification is the restorative version of Uttanasana, which helps elongate the spine and open the side ribs (see picture B).
B

1. Place a chair on your mat so that it doesn’t slide, and have it face the wall to alleviate possible fears.
2. Stand on the chair and follow the instructions for a Standard Uttanasana. If you prefer, you can begin with your hands on your hips before folding forward.
3. Grab the front legs of the chair. You can use your breath to slowly slide your hands along the legs of the chair and gain length.
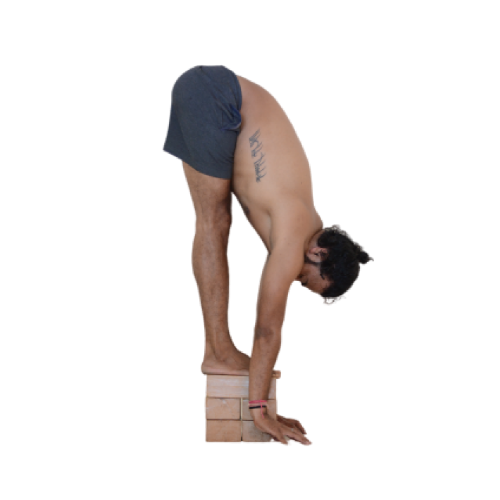
Version 2: Using blocks
While, for some people, holding onto something may help keeping the chest open (see picture B) others may prefer using blocks to gain space and depth. That said, this version is slightly more challenging than the previous one.
C
D
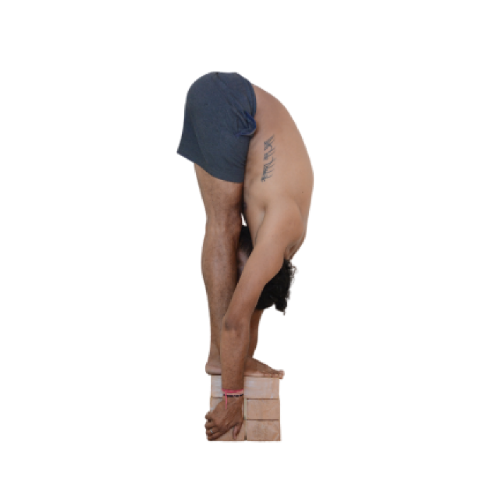
1. Pile up 6 blocks on your mat (you may need to adjust the height). Make sure they are compact and that they won’t slide.
2. Stand on the blocks and follow the instruction for a Standard Uttanasana.
3. Instead of placing your hands at the back of your ankles or besides your feet, start with your fingertips on your mat, slightly in front of the blocks (see picture C).
4. Keeping the front body open, slowly walk your hands to grab the back of the blocks (see picture D).
Interested in becoming a yoga teacher?
Newsletter
Upcoming events and latest blogs