What is Virabhadrasana / Warrior Pose?
Warrior Pose, known in Sanskrit as Virabhadrasana, is a series of yoga poses that embodies the mythic warrior Virabhadra. It’s a core posture, a lunging, standing asana that can help you build strength in your legs, spine, and torso. Warrior pose is important for developing your alignment, practicing deep and mindful breathing, and developing flexibility in your shoulders and back.
From Sanskrit to English:
Sanskrit pronunciation: Virabhadrasana (veer-ah-bah-DRAHS-anna)
Meaning: vira = hero, brave, eminent person; bhadra = blessed, prosperous, gracious. Known in English as Warrior Poses (I, II and III or – in Ashtanga Yoga – A, B and C) they are meant to commemorate the exploits of the mythical warrior, Virabhadra – an incarnation of Aadi Yogi Lord Shiva. Virabhadrasana I / A represents Virabhadra as he emerged from the ground, arms reaching towards the sky with his gaze up high. While the word warrior may be misleading, this posture is not meant to awaken violence. It actually refers to the “spiritual warrior” within us and symbolizes the fight against our own ego and ignorance. It is meant to help us cultivate the strength and courage it takes to always act with grace, even when we find ourselves in difficult circumstances.
Learn more about Yoga Teacher Training, click here.
Benefits of the Virabhadrasana pose
Virabhadrasana I / A is a foundational standing asana (pose) and is part of the surya namaskara (sun salutation). Here are some of the benefits of practicing this pose:
+ Strengthens shoulders, arms and back muscles, core and legs
+ Stretches the ankles, calves, hamstrings, psoas, chest and neck
+ Improves steadiness and sense of grounding
+ Helps fat reduction around the hips
+ Facilitates deep breathing by creating space in the chest region
Yoga for every BODY
Virabhadrasana I / A is an anatomically challenging pose for several reasons. Indeed, the legs are doing two different things, given that one is bent and the other one is straight. In addition, the pose requires very different actions from them, in order to steer the pelvis and get the hips to be leveled and point forward. And while all this is occurring in the lower part of the body, the upper body is meant to rise upward. So yes, there is a lot going on, and very few people can actually access the deepest expression of this pose. Yet as Virabhadrasana I / A teaches us, we need to fight against our ego and find alternatives to act heroically, with grace, regardless of the difficulties.
For this, we will first explore how to perform a “standard” Virabhadrasana I / A, and then share a series of modifications for you to adapt the pose based on your individual needs and personal practice.
Standard Virabhadrasana I or A
1. In Ashtanga Yoga, from Adho Mukha Svanasana, step one foot between your hands. In Hatha Class, you can also start this pose from Tadasana.
2. Pivot the ball of your back foot and drop your heel at about a 45 degree angle. Make sure your back and front heels are aligned.
3. Bend your front knee so that it’s at a 90 degree angle, directly above your front heel.
4. Bring your hands to your hips. Extend your back leg and let your back foot fall flat on the ground. Send your left hip forward and your right hip back so that they are square and parallel to the front of your mat.
5. Raise your arms straight up to the sky with your palms pressing together overhead, and your gaze up towards your thumbs or sky.
6. Take a slight extension in your upper back, open your chest and send your shoulders away from the ears. Draw your navel gently towards your spine.
7. If you are familiar with the locks, use Moola Bandha (Root Lock) to push the pranic energy upwards. This will also help you stabilize your hips.
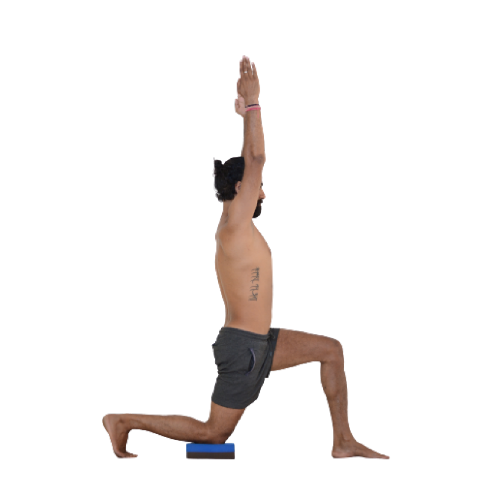
Modification 1: knees bent, palms apart and a soft block
This modification is great for beginners and general tightness encountered in the legs, the hips, the back, shoulders and neck. Mainly, what we wish to prioritize in Virabhadrasana I / A, is the alignment of the hips, as it automatically affects our spine. And we want to keep our spine safe!
A
B
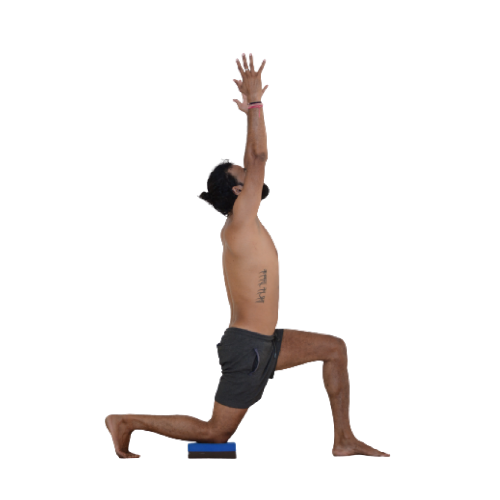
1. Begin kneeling on one knee, placing a soft block underneath it for protection and support. Tuck the toes of your back foot.
2. Bend the front knee so that it’s directly above your heel with your foot flat on the floor. Both legs should form a 90 degree angle, which will help you with the desired alignment of the hips.
3. If your shoulders are tight, raise your arms towards the sky keeping the hands separated so that they are shoulder-distance apart, your palms facing each other, with your fingers together. If your neck muscles are stiff or you happen to have neck problems or injuries, look forward (see picture A).
4. If your neck muscles are flexible, you can look up instead. Spreading your fingers wide as you stretch them towards the sky will help you open your chest and broaden your shoulders (see picture B).
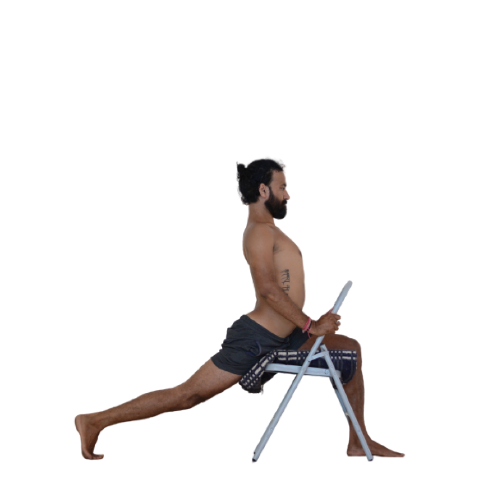
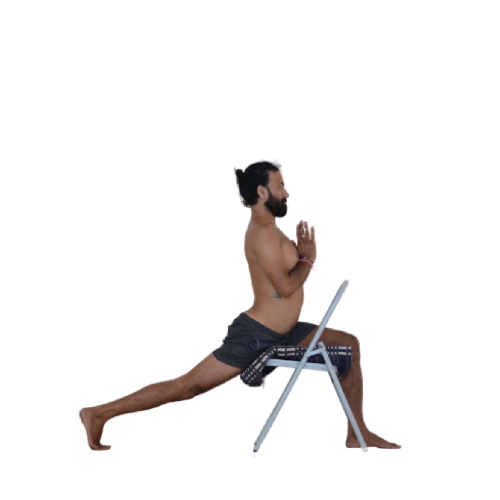
Modification 2: Chair + blanket version 1
Like any other prop, using a chair can offer great assistance. In the case of Virabhadrasana I / A, it can help support your body weight while allowing you to freely move your limbs. This is a great way to explore the pose and enjoy its benefits, especially for people who have limited mobility and / or are still managing an injury.
C
D
E
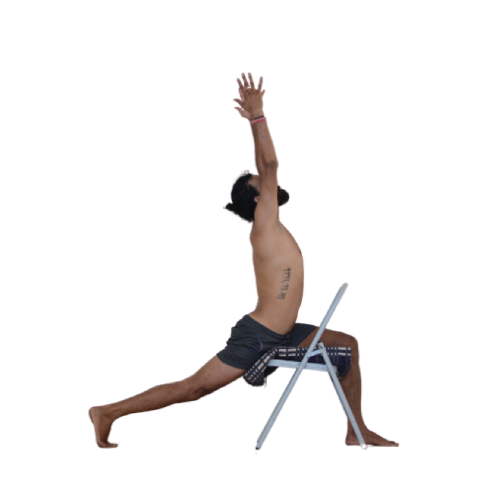
1. Set up a chair opposite you and place a blanket over the seat. Adjust the height of the blanket in such a way that will make you feel supported.
2. Step one foot forward between the back of the chair and the seat, and hold onto the sides of the chair.
3. Bend your front knee at a 90 degree angle and rest your pelvis against the blanket. Stretch your front foot toes to create a nice arch in the front foot. Extend your back leg and tuck your toes. This will help you square your hips and understand how the alignment is meant to be felt.
4. Raise yourself up. Open your chest, broaden your shoulders and send them away from the ears. You should feel a slight extension in your upper back. If you have neck problems or injuries, look forward. (see picture C).
5. As you get familiar with the use of the props, gradually add the arms. Keep pressing your feet into the floor and bring your hands in prayer in front of your chest to start working on your balance (see picture D).
6. Keeping the shoulders depressed, send your arms towards the ceiling, shoulder-distance apart, so that the palms of your hands are facing each other. Send your gaze to your thumbs (see picture E).
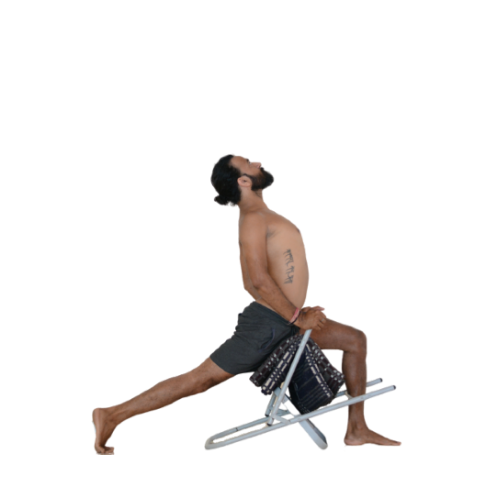
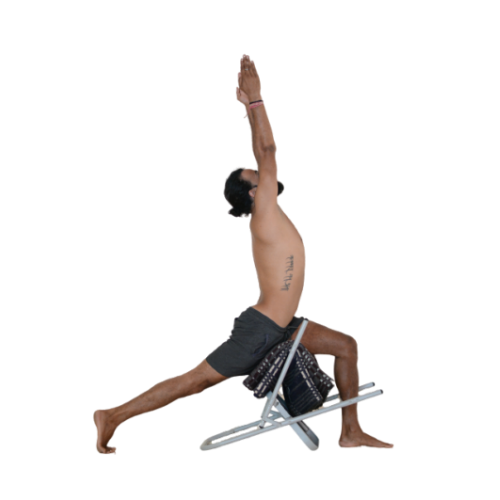
Modification 3: Chair + blanket version 2
If the above modification feels uncomfortable or unstable, try flipping the chair upside down. Once, again, we are all different so feel free to play with the props to find what suits best!
F
G
H
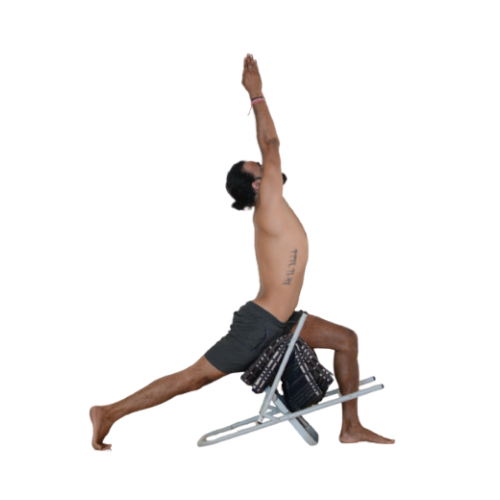
1. Set up a chair upside down and place a blanket over its spindle. Adjust the height of the blanket in such a way that will lead your pelvis to feel supported.
2. Step one foot forward. Bend your front knee at a 90 degree angle, your thigh should be parallel to the floor.. Extend your back leg and tuck the toes of your back foot. This, once again, helps level the hips.
3. Start by pushing your hands into the feet of the chair. Look up towards the ceiling and feel the extension in your upper back (see picture F).
4. If you feel comfortable here, raise your arms up, keeping your palms shoulder distance apart. Look towards the sky (see picture G).
5. You can try bringing the palms of your hands together and looking towards your thumbs (see picture H). If your shoulders raise and you feel they are tight or you feel tightness in your back muscles, go back to the previous step (see picture G or F).
Interested in becoming a yoga teacher?
Newsletter
Upcoming events and latest blogs